¶ Introduction
Routes (also known as controllers) are part of the 3 fundamentals of the MVC application model. The foundation of a Nodea application is based on the Express.js framework, and therefore its controller management system.
For more information: Express.js
¶ General class organization
First of all you should read Main Concept section about Entity: Entity Main Concept
Despite the foundation provided by Express.js, a Nodea application has its own file structure and specific operating principles (see Source Code Organization). Indeed the _core/ and app/ separation includes a management of the routes by a system of class which we will describe here.
¶ Core files
In the _core/ folder is an abstract_routes/ folder which contains 4 files:
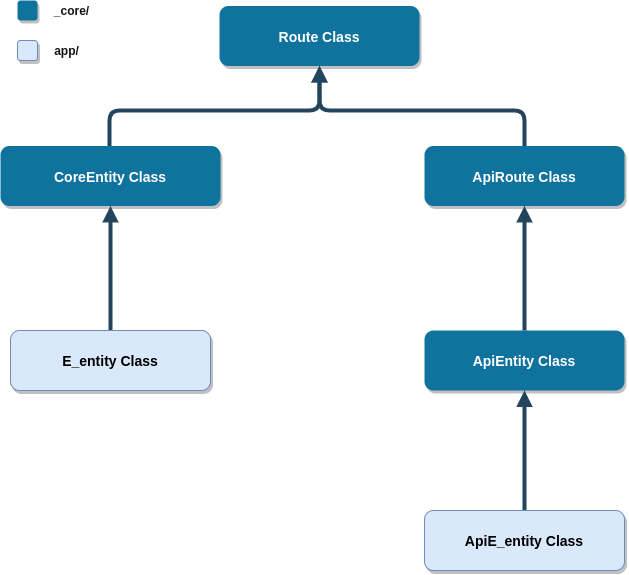
- api_entity.js → ApiEntity class that extends ApiRoute class
- api_route.js → ApiRoute class that extends Route class
- entity.js → CoreEntity class that extends Route class
- route.js → Route class
You will find in _core/routes/ files that already declared routes which are part of the native and mandatory routes of a Nodea application.
Some example:
- root.js → Handle the HTTP call on
/of the application - app.js → Handle the HTTP call on
/appof the application - login.js → Handle the HTTP call about login (
/login,/first_connection, …) of the application - module.js → CoreModule class that extends Route class, used to instantiate Module route.
¶ App files
¶ Index
In the app/ folder you will natively find several routes files which are necessary for the proper functioning of the application.
The file that deserves special attention is the app/routes/index.js file.
This file indexes all the application's routes and applies the declared middleware that you find in the routes files.
Note that Module type routes are URL prefixed by
/module:if (route instanceof Module) url = '/module';
¶ Native routes
Below you will find a table summarizing all the default routes when generating an application :
| File | Description | Concerned URLs |
|---|---|---|
| access_settings.js | Access management of the application, allows access to the access configuration interfaces for roles and groups as well as the global activation of the API. |
|
| address_settings.js | Address component configuration UI, see Address Component |
|
| api_documentation.js | Viewing the generated API documentation for the application |
|
| app.js | Management of the common routes to the entire application, it includes the management of upload & download as well as the initialization of widgets. |
|
| import_export.js | Management of imports and exports of the application, whether at the database level or also access configuration level (config/access.json). |
|
| login.js | Management of login, first connection and password reset functions. |
|
| notification.js | Management of the notification principle within the application. |
|
| root.js | Root file of the route files ¯\_(ツ)_/¯ |
|
¶ Global entity organization

As you can see in the following diagram a generated entity produces 2 files in the app/ folder.
The generated file app/routes/e_entity.js (e_entity is obviously replaced by the real entity name) extends the core class CoreEntity that define the default routes of an entity.
Generating an entity also generate the API side of it. This API entity js file is located in the app/api/ directory and also extends core class ApiEntity which extends ApiRoute.
You can notice that the Route class is above all class, this is why we will describe the structure of this file in the next part.
¶ Class Route
The class “route” is the parent class of all the routes in Nodea applications.
This class allows to define the global operations of the routes in Nodea, it define 3 important things:
- Getting and calling registered route
- Handling route hooks
- Define asyncRoute() method
We will define these 3 points in the context of their use. That is to say within an initialization of a child entity class.
¶ Middlewares
Access rights to routes and other preprocessing logic are handled using ExpressJS's middlewares logic (see ExpressJS middleware).
Starting from version 3.0.2, every middleware is defined in _core/helpers/middlewares.js.
There are two ways to define middlewares for a route :
- through
Routeupper classdefaultMiddlewaresvariable, - through lower class
middlewaresgetter.
¶ Route defaultMiddlewares
Here we'll see how to set middlewares globally for a given entity or set of routes.
In the Route class constructor, a defaultMiddlewares variable is initialized to an empty array, meaning that there is no middleware set in the Route class by default.
However, this array can be filled from the child class constructor. Any middleware set will be executed at the start of the middleware stack for every routes of the child class.
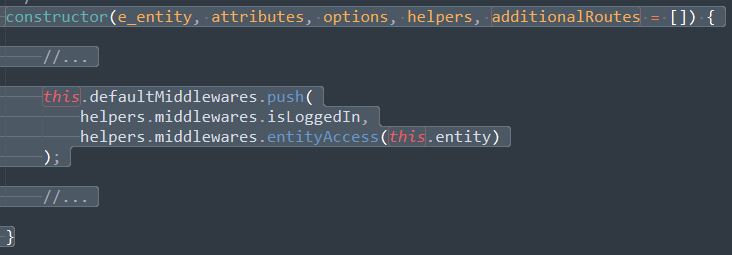
Let's see an example from the CoreEntity class that set two defaultMiddlewares for entity classes in its constructor :

Each route of any CoreEntity class will have two middlewares set by default, a login check and an entity access check.
It means that by default, this is not available to acces any kind of page of the generated application if the user is not logged in and if he has not the appropriate access right to the entity ( group access right ).
You can alter the defaultMiddlewares array from the Entity child class, in its constructor as well.
¶ Route middlewares
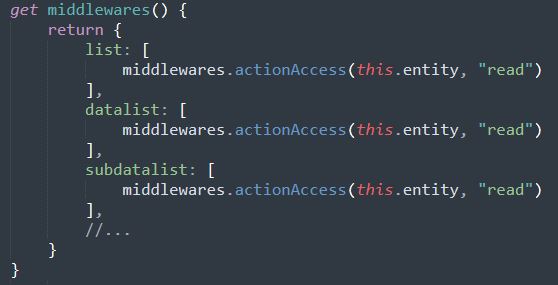
There is another way to set a middleware to a specific route. Each route defined in the _core/routes/ folder uses a getter called middlewares expected on the child class.
This getter returns an object with properties representing each route of the class. These routes properties provide an array of middleware to execute for this specific route :

This getter is then used in the route definition of the _core folder :

A route middleware array can be empty or have any number of middlewares. Of course, if a middleware doesn't call the next() callback, route call will be blocked and any other middleware won't be executed, due to the default ExpressJS middleware behavior.
¶ CoreModule
A module also has a route definitio but the default implementation of the module class is just made of a unique function called “main”.
This “main” route can be override if you want to change the home page of your module by adding some new elements.
In this case, you will need to rewrite the default main route and change the behavior with what you need.
main() {
	this.router.get(`/${this.moduleName}`, this.asyncRoute(async(data) => {
		// Your custom code
		data.res.success(_ => data.res.render(`modules/m_${this.moduleName}`));
	}));
}¶ CoreEntity
Entity class (name as CoreEntity) define the default behaviour of an entity within Nodea applications.
¶ Default routes
Before explaining how the generated file works in app/routes/e_myentity.js and how to customize the behaviour of your entities, it is first necessary to define the default behaviour of an entity which is therefore in the CoreEntity class (_core/abstract_routes/entity.js)
First of all, it is important to have read the concept of entity.
Now we will present how the routes are declared in the CoreEntity class and explain the default behaviour.
Here is a simple representation of routes declared in class CoreEntity:
the_route() {
	this.router.get('/the_route', ...this.middlewares.the_route, this.asyncRoute(async (data) => {
		if (await this.getHook('the_route', 'start', data) === false)
			return;

		// ... Core code ...

		if (await this.getHook('the_route', 'hook_1', data) === false)
			return;

		// ... Core code ...

		if (await this.getHook('the_route', 'hook_2', data) === false)
			return;

		data.res.success(_ => data.res.render('view')); // Example, can be also a redirection or just a response
	}));
}As you can see, a route is first of all a class method which will declare a new route in the Express.js router. For the native behavior of Express.js in the route declaration I invite you to read the official documentation of Express.js about Basic Routing.
Besides the normal behaviour of Express.js there are concepts that are not related to this framework:
¶ asyncRoute()
this.asyncRoute(async (data) => {})The asyncRoute() method is defined in the Route class and allows several very important concepts ⇓
¶ Async scope
Provide an async scope to the entire route. Because usage of async/await is strongly recommended.
¶ Data object
Prepare and put to use the data object
The data object is the main object of your route. It is provided at the start of your route and will carry all the information until the end of the route.
This data object must not be deleted, overwritten, destructured at the risk of losing important information for the proper functioning of the route.
Default data object structure:
const data = {
	req,
	res,
	transaction: undefined,
	files: []
}As you can see data contains req and res (request and response) from express.js and also:
- transaction: The Sequelize transaction used for all Sequelize call along the route.
- files: In case of POST route that have to handle given file from the client, you will find these files information in here.
Finally data object will be send to the Dust.js rendering process. So all variables in it are available in your .dust files for rendering.
¶ Error handling
The entire route is scoped into a try/catch which can handle potential error throws in the route in all cases. This makes possible the centralization of the management of these errors.
¶ Success / Error response
Provide the methods:
data.res.success(_ => {});
data.res.error(_ => {});These two methods must be used to declare that a route is successful or is in error. It is thanks to this declaration that it is possible to manage the cancelling of the transaction (and therefore not executing SQL request that should not) and also to avoid the potential writing of files on the filesystem if the route is in failure.
¶ Hooks declaration
You may be wondering what the following code is for:
if (await this.getHook('the_route', 'start', data) === false)
return;Well us too ¯\_(ツ)_/¯
Just kidding, this is the declaration of hooks within our standard routes to allow the inclusion of outside code from the app/ directory. This is simply the system that you will use to modify or add specific condition into the standard behaviour of the core routes.
We've set multiple hooks in each of our key moments in our route execution so you can step in at anytime.
Now we will explain how to work with this CoreEntity class in the app/ folder and the usage of custom routes, Nodea hooks system and Middleware.
¶ E_entity customization
When you add an entity via the Nodea generator, it will create an e_entity.js file in your /app/routes/ folder.
To be totally clear, executing the instruction:
add entity Product
Will generate a route files named app/routes/e_product.js and the class in this file will be: E_product (which extends CoreEntity). For this document we will call the file e_entity.js and the class E_entity to simplify.
This file, which will extend CoreEntity class, let you customize the native behaviour of your entity.
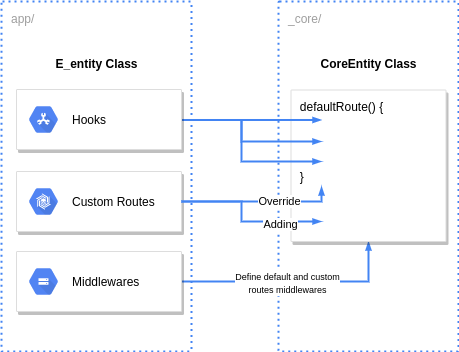
Here is a diagram which roughly explains how hooks, custom routes and middleware work with the CoreEntity class:

In addition, here is the structure of a generated route file e_entity.js:
Watch full file here → Default e_entity route file
const CoreEntity = require('@core/abstract_routes/entity');

class E_entity extends CoreEntity {
	constructor() {
		const additionalRoutes = [];
		super('ENTITY_NAME', attributes, options, helpers, additionalRoutes);
	}

	get hooks() {
		return {
			route: {
				// hooks1: async(data) => {},
			},
	}

	get middlewares() {
		return {
			route: [
				// middlewares
			],
		}
	}
}

module.exports = E_entity;Now lets explain how you can develop and customize your app behaviour with this file:
¶ Hooks usage
Hooks in routes allow you to add specific code at key moments in the execution of native routes of a Nodea entity. Indeed, a generated entity natively embeds routes which already cover the main common operation of an entity (See Entity URLs).
Do not confuse hooks in the routes and the hooks of the sequelize ORM in the models, see Models Hooks
¶ JSDoc generation
In order to be able to integrate your code, we have therefore made available a certain number of hooks, we will not describe all the hooks one by one here but rather their overall functioning.
To find details of each available hook, we invite you to consult the JSDoc generated with your application. See the
jsdoc.conf.jsonand thepackage.jsonin order to customize the generation behavior.See Nodea JSDoc
Lets start with a real hook as an example to explain how its work and list what you can do, lets use the start hook of the show route:
get hooks() {
	return {
		show: {
			start: async (data) => {
				// Example 1 - Getting data from database (Do not forget to require('../models'))
				data.myDBData = await models.E_my_entity.findAll({
					transaction: data.transaction // Don't forget to include the route transaction in each models calls
				});

				// Example 2 - Log the current user
				console.log(data.req.user);

				// Example 3 - Stop the current route and throw error
				throw new Error('An error occured, do not panic, please contact someone, maybe the app administrator');

				// Example 4 - Stop the current route, redirect with a toastr message (less aggressive than example 3)
				data.req.session.toastr = [{
					message: 'Something went wrong :(',
					level: 'error'
				}];
				data.res.error(_ => data.res.redirect('/module/home'));
				return false;

				// Example 5 - Customize behaviour with given parameters example
				// In this start hook the data.renderFile is a parameter that can be change
				data.renderFile = 'my_show.dust'; // Instead of default 'show.dust' file
			}
		}
	}
}To stop the route from executing after the hook you have just to return false.
¶ Custom routes
Custom routes is the way to adding new route (so new URLs) to your entity and also give you the opportunity to override default entity routes in the case you want to rewrite totally the default behaviour and hooks system is not enough to do that.
To do so simply add a class method to your E_entity class like this:
myNewRoute() {
	this.router.get('/myNewRoute', this.middlewares.myNewRoute, this.asyncRoute(async(data) => {
		// Custom code
		const myDustData = {
			key1: 'value1'
		}
		data.res.success(_ => data.res.render('e_entity/myNewRouteView', myDustData));
	}));
}

get hooks() {
	...
Note that it is not recommended to send the data object in the rendering, indeed since it contains req and res you will probably get an circular json error.
Then do not forget to specify your new additional route in the class constructor:
constructor() {
	const additionalRoutes = ['myNewRoute'];
	super('e_entity', attributes, options, helpers, additionalRoutes);
}And to override default entity route simply use the same method name as the route you want to change. There is no need to specify the route in your E_entity class constructor in this case.
Default Nodea routes methods are:
- list
- datalist
- subdatalist
- show
- create_form
- create
- update_form
- update
- loadtab
- set_status
- search
- fieldset_remove
- fieldset_add
- destroy
¶ Generate error
In a hook or a custom route you will have to generate errors in order to stop the execution of a route. This generation of error depends on the situation in which you find yourself. Below you find summary code of how to generate errors.
// Example 1 - Stop the current route and throw error
throw new Error('An error occured, do not panic, please contact someone, maybe the app administrator');

// Example 2 - Stop the current route, redirect with a toastr message (less aggressive than example 1)
data.req.session.toastr = [{
	message: 'Something went wrong :(',
	level: 'error'
}];
data.res.error(_ => data.res.redirect('/module/home'));
return false;

// Example 3 - In case of ajax call you need to call error and then send your error message that will be handle by
// the Nodea client core with a toastr
data.res.error(_ => {
    data.res.status(500).send('Sorry an error occured.');
});
return false;
¶ Middlewares
Then at the end of your e_entity.js file are defined the middlewares for all routes (whether custom or default routes). By default there are the default access and file management middlewares for the default Nodea routes, you can change or add middleware at your convenience:
Short example:
get middlewares() {
	return {
		show: [
			middlewares.actionAccess(this.entity, "read")
		],
		myNewRoute: [
			myMiddleware()
		]
	}
}